Our Ultimate DIY Baseball Hat Rack Ideas & Tips
If you are a lover of baseball hats then you might have the issue of storage, you don’t want to dump your hats on the floor and keeping them on the coat racks can create a cluttered feeling inside of your home, so what’s the solution?
Well, why not try making your own DIY baseball hat rack? In our guide below we will go over some different baseball hat rack ideas. a method to making your own DIY baseball hat rack for beginners and some important tips for making your successful rack.
Let’s get into it!
The Best DIY Baseball Hat Rack Ideas
If you planning to make your DIY hat rack for your baseball caps, it doesn’t have to be an expensive job, you can make these wall-mounted hat rack ideas from so many materials such as wooden boards, a copper pipe, ropes, plain hooks and more.
To help you design the right kind of wall-mounted hat rack for you, we’ve listed out the best DIY hat rack ideas for you to choose from below.
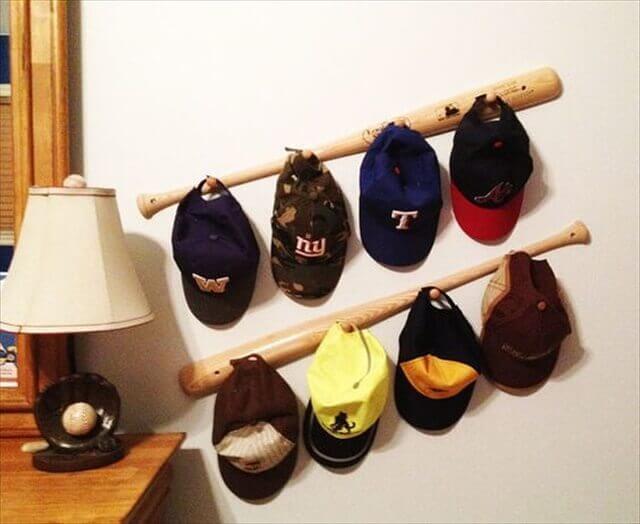
DIY Standing Baseball Rack
Scrap Wood Hat Rack
Who said your DIY baseball hat rack had to be fancy? Why not try making one out of some scrap wood, this makes a great wall art paired with antique-looking hooks plus saves you money!
All you need to make your wall decoration and rack is a scrap wooden pallet which you can cut and sand down to your required size, then take a ruler and mark a long pallet where you want your hats on the wall to be.
Attach your type of hooks to each predrilled hole then your hats and hang where desired.
Hanging Copper Baseball Hat Rack
A copper pipe is a unique way to hang your baseball hats at home with some golden hooks for aesthetics.
To make this copper rack choose a copper pipe around 1/2-inch in diameter between 5-inches and 10-inches, make sure you additionally have two copper end caps, two copper pipe straps, curtain rod rings, a hammer and some nails.
Nail your pipe straps into the wall of your chosen location and add the end caps to the copper pipe that you have chosen. Push your curtain rings onto the pipe and slide the pipe into the strap, make sure your pipe is straight on the wall then place your pipe strap on the other end and nail it into place.
The Curtain Rod Hat Rack
This curtain rod baseball hat rack is an excellent choice for hanging the everyday coat or baseball hats and will not break the bank.
For this simple DIY project you will need an old curtain rod, some drapery hooks, a ruler, cordless screwdriver, simply securely piece and attach the wall then voila!
Pegboard Hat Rack
A pegboard hat rack is a stylish way to display your hats for baseball lovers, all you need is four pieces of 1″ x 2″ x 4′ long wood, a 2′ x 4′ piece of pegboard, some paint and a few L brackets.
To start you simply have to paint the pegboard to your desired colour, then frame the pegboard with your long wooden pieces having 1-inch of the exposed frame, paint the wood pieces, lay the pegboard on tops once dry and secure with your L brackets.
Nail the pegboard onto the wall, place your curved hooks on the holes and you have a well-organized hanging baseball cap rack!
A Rope Hat Rack
This rope hat rack not only acts as wall art but it is a cool and unique way to display your hats, plus some fun DIY!
For this roper rack you need to have 6 x 3.5 3mm ply cords, 2 X 30 cm 3mm ply cords for the gathering knot, a small wooden ring and one of your baseball hats!
To make the hanger you will need to fold the six cords in half then attach the ring by making a larks head knot. Spread the cord into three sections, make 15 knots on each one then braid the three knots together, split the cord into two sections and add two knots to each of them.
Fit the hat and make one more knot and there you have it!
The Old Shutter Hat Rack
This is one of the most unusual ideas we have for a hat rack in your home and works by using an old shutter!
For this, you will need to have an old shutter lying around which can be re-purposed for this DIY project, to make it, ensure you have some paint, sandpaper, Acrylic polyurethane, tools such as a screwdriver, drill and a paintbrush and lastly some homemade hat hooks from old dresser knobs.
The making process starts with painting your shutter then sanding it down for a vintage look, adding a coat of your acrylic polyurethane and adding the hooks and knobs once dry with your screwdriver and drill, the hook racks can be from anything you choose.
Attach the shutter to the wall and you have your vintage-looking baseball hat rack!
Zig-Zag Wall Mounted Hat Rack
If you don’t want to make a standard straight wall hat rack, you can always try a zig-zag one made out of wood.
You will need some wooden lumber for this job, wood glue, a drill, screws, screwdriver, picture hangers, wood pegs and a ruler plus pencil.
Sand down your several pieces of wooden lumber then places each wood on top of each other at a 90-degree angle and drill, ensure your bit is the same size as your pegs. Insert a screw and drive it through the top piece slightly into the second.
Insert the peg and repeat till all pieces are done, You will have three pegs on a piece of wood, mark the middle one on each and drill it, add a drop of wood glue to each hole, insert the pegs to dry. Attach your hangers on the bottom and top of the rack and place them on the wall with screws.
Hang your hats!
Baseball Hat Gallery Display
This is a great way to display your basketball hats if you don’t want your baseball hooks to show on the wall, it essentially makes your hooks look like they are floating.
For this DIY, all you need are some hooks of choice, for the best-looking ideas we suggest choosing rustic style hooks, this will keep your wall looking nice even when you have removed the hats.
Wooden Dowel Basketball Hat Rack
Wood dowel hooks are like standard hooks but look prettier on homey walls and can be easily made with some dowel wood and a few tools at home.
Find some 1-1/4-inch wood dowel, sandpaper, a mitre box for accuracy, a drill and drill bit, dowel bit, drywall anchor and pliers. Have your mitre box at a 30-degree angle and cut your wood at an angled position for each hook you want.
Now drill in your screws 3/8-inch from the top of the wood, use your pliers to screw in the dowel screws. Screw the drywall anchor into the screws and drill a 5/16 hole and install the drywall anchor inside. Screw your drywall anchor in and you have your dowel hooks.
Tree Stick Hat Hanger
Making use of a sturdy tree stick is an excellent way to hang your hats at home without any expensive wooden pieces needed or coat rack hangers.
To get started, pick a piece of tree branch of choice, some white string, clothespin, super glue and scissors. Measure where you want the DIY hat rack wall to be and hammer your clothes pin in the centre, cut your piece of the string according to the drop you want and double knot each side of it.
Choose the number of strings you want according to the number of hats that you want to hang and double knot the pieces of string onto the hook. Hang your tree branch onto the wall with the string keeping the weight even on each side. Taadaa!
The Teepee Hangers For Coats & Hats
Why not build a teepee for your coats and hats, this cool hanger makes a functional coat rack and hat rack and even looks lovely as a piece of furniture.
On the hand, you will need 72-inch wood dowels, a small hacksaw, rope, masking tape, white paint and a paintbrush.
To begin, cut your dowels all to an even length with a hacksaw keeping them 63-inches in length, wrap some masking tape 12-inches into the centre of each stick and paint them with white paint for aesthetic reasons.
Remove the masking tape for a clean edge then gather all the dowels together when dry, tie a piece of the rope securely around all of the pieces, spread the dowels at the top to create a teepee look.
Animal Hat Rack
This is a great hat rack to choose for your baseball caps if you are looking to hang them for a kid.
To make your animal hat rack you will need some plastic animals which you don’t mind cutting in half, wooden screws, a small hacksaw, epoxy, wooden board, a drill, some masking tape and a vice grip could be of use too.
Cut the animals in half with a drilled hole in each one for a screw to fit through, fill the hole with epoxy, the screw inside and allow it to dry. Drill the holes on the board where you want your hooks to be then screw each plastic animal inside!
Industrial Hat Rack
An industrial baseball hat rack is great for a boys bedroom or can be the feature point of an entrance hall wall. Ensure that you have one piece of 1″ x 6″ board at 5′ long as well as two D-brackets for hanging the rack once made.
You will then need five of each for the following; 1/2″ iron floor flanges, 1/2″ iron 90-degree street elbows and 1/2″ iron plugs, you will need around 20 1/2″ screws too.
First cut your wooden board to the desired length and sand it down to keep it smooth, place the top flange just below the top of the board, attach it with remaining flanges and screws keeping around 8.5-inches apart.
Add the street elbows to each flange plus the top of the elbows. Now add the D-rings to hang the whole rack, you can also just simply lean the rack against the wall if you want to keep the wall without nails.
Horizontal Hat Rack
Since most hat racks are vertical, a horizontal hat rack could also be a nice idea and works as a coat rack too. This one, in particular, is made out of driftwood so gives nautical styles to your home and is a fantastic idea to keep your baseball caps nice and organised.
For this coastal type hat rack, you will need one piece of driftwood, a piece of wood to match for the backside, a drill, some screws, spray lacquer, keyhole hangers, wood glue and some coat hooks.
Dry your driftwood out in the sun then spray some lacquer on top for a matt finish, fasten your wood to the underside to help the driftwood lay flat against the wall. Paint the wood white if desired then attach your keyhole hangers.
Drill your holes in the wood for your keyhole hangers and put a bit of wood glue inside of each one, now mount the backing to the wood by drilling a pilot hole through the back into the driftwood add wood glue before inserting the screws.
After putting the backing on, drill the holes for your coat hangers in the wood and screw on each hanger.
The Little Tree Branch Hat Rack
This baseball hat rack is an excellent project to make with your kids using resources from your garden and is super simple to make too.
Simply find some strong branch twigs where you can, you will need a pruning saw for this, a cedar wood plank, drill, wood screws and some white latex paint.
Pick your branches according to the appearance you want then lay them out in their desired pattern, sand any sharp edges of the twigs to avoid them piercing your baseball cats, drill your pilot holes into the wood and prepare your latex paint.
Dip each branch into the latex paint then place them onto a piece of baking paper until they become dry. Carefully drill each screw into your branches through the pilot hole, mount the rack then hang your caps.
Wrought Iron Vintage Hat Rack
For people who are looking to add a little more style to their lovely coat rack and hat rack, making a vintage rack out of wrought iron is an excellent idea since it can be shaped and designed into any pattern and size that you want.
It is important to know you might need some welding done for this hat rack since it’s not based on wood, making it harder to do DIY.
Multi-Level Hat Rack
A great way to showcase your range of basketball hats is by taking a standard horizontal rack and making it vertical then adding shelves to make multi-level stands for each hat.
You’ll need three long pieces of wood to choose your size which should be painted first too, you can then add multiple shelves onto the racks and bracket them in. Make sure the space between each mini shelf is at an equal distance to make the rack look uniform.
Simple DIY Baseball Hat Rack
If you after a simple DIY project to hang your hats, this is likely the best choice, all you will need are some standard long pieces of wood which you will use a rack, you can then use a hole saw to precisely cut each of your holes in the rack making sure they are at a 45-degree angle slope to allow the hats to sit right.
Hammer DIY Rustic Coat & Hat Rack
This is one of the most unique wood pieces of hat racks you could DIY at home, you will need a lot of spare hammers on hand however since their technically your industrial styles hooks.
To make the hammer hat rack you will need a long piece of wood and around 4-5 hammers, since you only need the hammerhead, you will have to saw the handle off or use fake hammerheads, ensure your paint you would before hand then make holes where you want each hammer hook to go.
Screw-in each hammer hook and there you have it, a vintage baseball hat rack with an industrial DIY twist!
How To Make Your Own DIY Baseball Hat Rack (Our Step By Step Guide)
Now we’ve gone over some unique and easy DIY baseball hat rack ideas you can try at home, let’s discuss how to DIY your hat rack with a simple idea in more depth down below, this makes the process easier to follow for beginners.
Tools Needed
- Pallet wood one bigger in width.
- Drill and drill bit.
- Sandpaper.
- Old baseball balls (for the hooks).
- Paint.
- Clamp.
- Screws.
Step By Step
- Start by cutting your two pieces of the pallet wood to the same length that you desire then sand each one till it becomes smooth.
- Since you are putting it together with screws, make sure the drill bit you are using is smaller than the screws for making the pilot holes, clamp your smaller size board on top of the larger board.
- Drill your pilot holes in the wood and screw them to ensure they are stuck together, now drill your pilot holes in even spaces along the wider board to make the hooks.
- Paint your piece or stain it.
- Now attach your baseballs once dry by screwing into the back of the wood piece through the pilot holes, attach your DIY rack on the wall using wall anchors or holes then hang your caps on your baseball hooks!
Essential Tips For Making a DIY Baseball Hat Rack
If it’s your first time attempting a DIY baseball hat rack then starting a new idea or project can be overwhelming, we’ve listed some essential tips below for making your hat rack to give you the best results.
- Paint or stain the wood beforehand – Before you start attaching hooks or copper rings to your rack in the DIY process, always make sure to sand and paint or stain the wood beforehand to your colour of choice, this is much easier than trying to paint around the hooks.
- Consider whether you can hang it – Not every house can you hang items on the wall, especially if you are living in a rental house, you want to avoid making holes in the wall, if this is the case, you can always consider making a free-standing hat rack.
- Ensure hooks are evenly spaced – When you are on the last part of your DIY hat rack process, make sure the pilot holes your drilling for your hangers are even spaces, this is what will make your hats look organised.
- Think about how many hats you want to hang – Before choosing on a particular design, take into consideration how many hats you want to hang, you would be better off choosing shelves if you have a huge range of hats to hand than a single wood rack.
- Keep with the vibe of the home – Consider how the baseball hat rack will look in your home, an industrial baseball hat rack might look better in a modern home, while an animal hat rack is suited to a kids bedroom.
Last Words
In conclusion, we hope you enjoyed going through our range of DIY baseball hat rack ideas and we’ve inspired you to make your DIY rack at home. Making your hat rack is a great way to reduce the clutter from your hats and doesn’t have to be an expensive job as long as you have some spare wood on hand.

