Building a sleeper wall is a simple to do project for any garden DIY’er, it is very affordable to do unlike building a brick wall and only needs a few tools, helping you to fence off flower beds or lawns with ponds.
To build a sleeper retaining wall you will need to make sure that you have some screws, a shovel and a drill, you will also need to decide if you want a vertical sleeper retaining wall or a horizontal type.
We will cover how to construct your sleeper retaining wall down below in both a horizontal and vertical way as well as the benefits of using sleepers for this project.
Why You Should Use Sleepers To Build a Retaining Wall?
Sleepers are a great material to make a wall with, you can cut them and shape them to how you want and they are still very durable and needs little maintenance only once a year.
If you decide to use sleepers as a retaining wall in your garden not only are they simple to construct, but they can also hold up to all weather conditions.
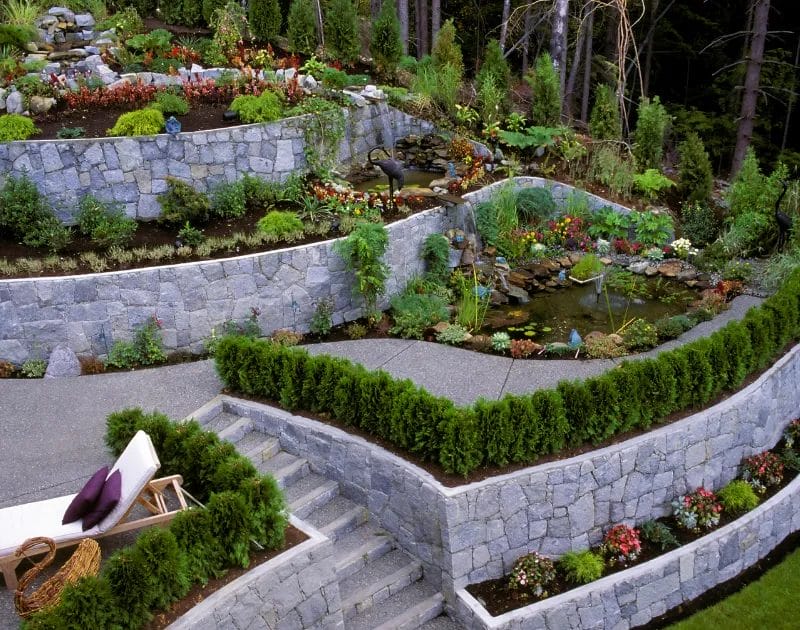
What Is a Retaining Wall?
A retaining wall is also known as a garden wall and is used as a pretty divider as well as to keep back earth and water on a slope.
When building a retaining wall with sleepers you will be faced with a choice of different types, we have listed them below.
- Reclaimed sleepers – These lengths of wood are very rustic but are not suitable for use as a vegetable retaining wall.
- Softwood sleepers – Very easy to cut and make an attractive wall with a modern finish that will last you for years and years.
- Hardwood oak sleepers – These sleepers make attractive garden walls but will need to be treated beforehand, they are also quite heavy.
Our Guide To Making Your Sleeper Retaining Wall
Making a sleeper retaining wall doesn’t have to be difficult, but you will need to decide whether you want to build a vertical straight wall or horizontal styles of sleeper wall.
If you decide on a horizontal sleeper wall structure then the woods will be stacked on top of each other and screwed in place, while a vertical straight sleeper wall gives you the option to make a wall to curve and a taller wall of your choice.
In our guide, we will discuss a step by step method on how to build a retaining wall with both styles.
How To Make a Vertical Sleeper Wall
Tools Needed
- Shingle.
- Sleepers.
- Concrete.
- Coach bolts.
- Water.
- Screws and drills.
- Shovel and wooden pegs.
- String line.
- Panel saw.
Step By Step
- Step one – First of all, take your measure and mark out where exactly you want your sleeper wall to be, once measured make sure to mark it with your pegs and string line.
- Step two – Now you need to measure your sleepers width then divide the wall length by this number, this will tell you how many sleepers you will need for the wall projects. Cut your sleepers with your saw according to the length you need.
- Step three – Dig a trench to a third of the depth of your longest sleeper length plus around 500mm then put the scalping’s inside and smooth it out, this will be your foundation where the sleepers sit so as you don’t have an unstable sleeper wall.
- Step four – Lower your sleepers into the trench you have made until your wall is how you want and pour in your cement mix, and water and allow the cement to dry. You can also backfill the wall with shingles to encourage drainage.

How To Make a Horizontal Sleeper Wall
Tools Needed
- Concrete.
- Sleepers.
- Scalpings.
- Bolts.
- Screws.
- String line and pegs.
- Drill and saw.
- Shovel.
Step By Step
- Step one – Mark out the area you want your wall to be with your measuring tape and string line.
- Step two – To create a drainage foundation for your sleepers dig a trench that is 400mm wider than your sleepers and doubles the depth, put your scalping’s into the trench, this will all help with moisture drainage.
- Step three – Make the surface even with your shovel then pour the cement mix into the trench till it is around 500mm.
- Step four – Now lay your base sleeper, you can do this by driving a coach screw through each end of your sleeper at the widest side till it gets to the other side. Then place the sleeper on its flattest side so as the screws are facing downwards into the concrete.
- Step five – Make sure the base is flat and even by checking with a spirit level then put the rest of the sleepers into the foundation.
- Step six – You can now start to stack the sleepers however you want to make sure that you overlap the joists slightly to create a strong structure, once you are happy with the set-up you can then drive screws through the top of each sleeper into the one it is placed on.
- Step seven – Make sure the screws are around 500mm apart for the best strength.
- Step eight – Backfill any gaps around the fence post to help with adequate drainage around the walls then add any treatment to the wood for finishing touches.

Frequently Asked Questions About Sleeper Retaining Walls
How do I stop my retaining wall from leaning forwards?
If you are building an upright sleeper wall that is quite tall then you might need to support the back of it with some metal posts to make sure it does not lean forwards.
What depth should my foundation be for an upright sleeper wall?
The depth of your foundation wall should always be by rule one third in the ground and two thirds out depending on the height of the wall.
How do you make a curved wall?
To make a curved wall you will simply need to place the sleepers at a slight angle when you are doing the wet cement foundation.
Final Words
Overall, building a sleeper retaining wall is simple to do rather than build a stone wall in your garden, you can change the design of your wall whether you want a curved wall or straight wall and adjust the height of the wall according to your needs, just make sure it has enough drainage in the firm ground.

